'It is better to light a candle than curse the darkness' Proverb
Showing posts with label Making my clothes. Show all posts

Sunday, 13 November 2022

Changes to my Wardrobe

A little while ago I wrote about what my plan was for my wardrobe moving forward.  I'm still working towards this plan, in fact I'll hopefully complete it by the end of this year, but when I was looking at my wardrobe the other day I suddenly realised that I have a lot more clothes than I had originally planned to have or had in the past.

Obviously I also have work gear as my job is outdoors in all types of weather and some additional items like thermals that I keep for work, camping, or if we travel somewhere cold, but I'm not going to include them here.  In fact, the small amount of clothes I have for work compared to the large amount of non work clothes is bordering on hilarious when you think about the fact I spend more time at work.

So, this is my wardrobe right now:

  • Jumpers and cardigans - I now have two cardigans, one for warmer weather and one for colder, and two jumpers, again one for warmer weather and one for colder, all made by me.  There's one more I want to make but that'll be it on the knitted jumpers front.  I also have a fleece which I use when walking and camping, and a hoodie that I like to wear now and then.
  • Trousers and shorts - I have my homemade 1940s style trousers that I basically wear all the time, a pair of outdoor trousers which I usually only wear when we're walking, and a pair of trouser I got from Niger twenty years and which I still wear.  I don't see me ever getting rid of these, they'll have to fall apart first.  I did make a pair of more tailored shorts as I had planned (paperback shorts), but then decided to make a second pair using fabric with the map of middle earth on it for walking in.
  • Skirts - I had only really planned on have one or two of these, but I now have four.  The first is a Ra Ra skirt I've had for years and was made in the UK, the second is a black one that use to be my Mum's which I'd borrowed for a funeral and she'd told me to keep, the third is the skirt I made using the left over fabric I'd had of goldfish fabric, and the last is of course my wedding skirt that I was meant to have shortened already but still haven't had the heart to.  
  • Dresses - this is still the same one as I had before and which I plan to replace with one of the same style I'm making myself so that it actually fits properly.  I had only planned on having one dress but there are some styles I would like to try and make so it might go up to three in the future.
  • Long sleeved tops - I have more of these than I had originally planned with a shirt I brought from Brewdog, one that was brought in support of the British Wildlife Trust, and two other long sleeve tops I had gotten from charity shops as I wanted just some plain styles.  I do wear all of them, but I don't really need this many so I'll just not replace them when they get old.
  • Short sleeved tops - I also have too many of these, but I also wear all of them as well.  I have two pieces that I made which are the wrap top I made whilst trying to work out the top of the wrap dress and of course my wedding top, the rest are either brought mostly to support a organisation, had for ages like the purple top I wear when we go walking, or that I got second hand either from a vintage shop or from my Mum.  As with the long sleeves I just won't replace these as they get old.
  • Strappy tops - I think I have the right amount of these.  A skin toned one which I did buy new as I couldn't find one in the charity shops, a charity shop find that I love but has gotten to manky I should probably throw it out, and a black one I got at Brewdog and which I really love the style of though not all the logos.  I actually think I might make one out of some of the yarn I have left over, but I'm in no rush to do that yet.
  • Shoes - weirdly I have more shoes for warm weather at the moment than cold, but I guess that fits for Devon.  For what I use them for I think I have the right amount, though I probably won't replace ones that get destroyed unless I feel like I need to.
  • Outer wear - this is pretty basic.  A tailored jacket, a waterproof jacket, a zip fleece, and a gilet.  I don't feel like I need anything more than that.
The make up of my wardrobe now (not including shoes and outer wear) is 14 brought new, 6 second hand clothes from charity, vintage shops, or from family, and 11 homemade by me.

I definitely have more clothes now than I actually need, but I do actually wear all the pieces so I don't see me getting rid of any of them any time soon.  I just won't replace them once it's time to get rid of them.  I did think about maybe going for a capsule wardrobe and putting some of the other items away for a bit, but I actually enjoy having the choice and being able to layer up depending on the weather so I don't see much point in that for now.  The next thing I'm going to sew is the wrap dress to replace the one I already own and once that is done I will have completed the list of things I had planned for my wardrobe at the start of 2021 - I managed to get through that a lot faster than I had originally thought.  My ideas for my wardrobe are still the same as then, but it has become bigger than I had planned.  It does make me wonder how it's going to change in the future.

Sunday, 17 July 2022

Crafting Goals 2022 Update #2

I wasn't expecting to get too much done this quarter as I had decided to take a little break from crafting after the wedding as I'd done quite a bit for that and I didn't want it to turn into a chore.  However, I actually returned to it a lot quicker than I was expecting.

Vivien Fair Isle - Style Jumper

I decided to do this jumper next as we're in summer right now and this is more of a summer knit.  I couldn't get the wool recommended in the pattern (from the Knit Vintage book) and so had to buy a slightly different kind which had a different gauge. This means that I am using different needles from the recommended and I'm not sure I've gotten the tension right so I'm not certain it's going to fit quite how I originally planned, but I still like the look of it.  I've also slightly changed it as I'm knitting it in the round rather than doing each section separately.  I didn't actually start it all that long ago, but already I've gotten quite far as it's been quite enjoyable to make.  Something I wasn't expecting when it came to doing colour work.  The wool is 100% Alpaca by Drops Design and it is ridiculously soft.  I can't wait to wear this one.

The Wrap Top

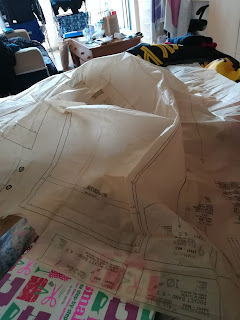
I'm using the top section of the Butterick B6554 wrap dress to make a wrap top.  This is partly because I want a wrap top and partly because I want to practice this part of the dress as it's going to be the most complicated due to fitting it around my chest.  I've measured the back and front in different sizes to fit this and then I'll need to work around fitting the two together.  Unfortunately my back is actually needs pattern pack which is a size down, but I don't want to buy another pattern just for that so I've picked the smallest size in this pattern and I'll just have to make that do.  Once that's done I can transfer the changes to the top half of the dress when I make it.  I'm reusing the fabric from the culottes I made a couple of years ago but don't wear anymore.  I really do love this fabric so I want to get as much use out of it as possible.

Lord of the Rings /The Hobbit Cross-stitch - Riverdale

These types of cross-stitch always take a while to do.  That being said, I've made more progress in this than I was originally thought I would.  I really love how it's looking and I know it's going to look great beside the Hobbiton one.  This craft alway takes a back seat to the other craft work I do and I haven't worked on it for a few weeks now, but I'll pick it back up again soon.


Once these are complete I'll have the Maggie and Coddy jumpers to knit and the wrap dress to sew.  I also picked up yet another project when we were on Guernsey, and that was making a Guernsey jumper using the 5 ply wool that unique to the island.  Whilst we were there I saw the Guernsey jumper which is made using 5 ply wool that is unique to the island.  So I brought some of their wool and was kindly given a free pattern, which I'm going to use to make Ed yet another jumper.  The poor guy will soon have more jumpers than he's ever had in his whole life.  It's especially humorous as he actually runs hot and so doesn't actually need them all.  Oh well, at least it's keeping me busy and that'll probably be the last one I make anyway - famous last words.


Sunday, 27 February 2022

Wedding Outfit: the Petticoat

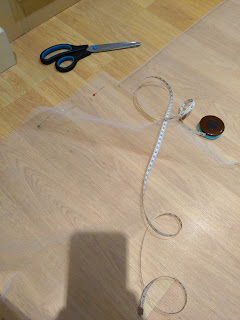
I'm not sure you would actually call this a petticoat, more of an underskirt to help give the actual skirt the volume I wanted.  I did think of making a proper petticoat, but I wasn't sure if I would actually have the time.  Maybe some other time.  For this quick project I decided to use tulle as it's a very light weight fabric and an easy way to make volume.  I got 4m of it and actually ended up with much more than I had intended as it was actually folded up more times in the shop than I realised.  I didn't use a pattern for this, but just put it together based on the shape I wanted.  

The plan was to make two layers that was made up of two tiers of the tulle, with each tier being about 55cm wide.  The length of each tier was based on my hip measurements, with the top tier being twice my hip circumference and the bottom tier being four times my hip circumference.  Both of these were gathered to give the volume I wanted.  Construction was pretty simple.

First I put in a long stitch along one of the longer edges of the bottom tiers and pulled on the thread to gather it until it became the same length of the top tier.  I then sewed the two tiers together.

I then put a long stitch along the top tier and gathered that in until it fitted the size of my waist.  I had originally planned to then sew this into its own waist band, but I realised that this would just add an extra layer to my waist and would be something else I would need to manhandle on the day.

When I first attached it to the waist band of the skirt and tried it on I realised that it was far too bulky around the waist.  So I detached it from the skirt and undid the gathers.  I then put in darts instead to draw in the waist width and reattached it to the skirt's waistband.  This worked much better and still produced the extra volume I was wanting.

I then sewed up the sides of the two layers, stopping just below the opening of the skirt.  The last step was to ensure that the hem of the petticoat was just above the hem of the skirt.  I hung up the skirt inside out so that the petticoat was on the outside to my dressmaker's mannequin and left it for a little bit of time to allow any stretching to happen.  Then I cut the hem by the needed amount.

This petticoat actually turned out a lot better than I was expecting and, even though you won't actually see it on the day, I'm a little proud of it.  It has made my skirt sit exactly how I want it without adding any unnecessary bulk or weight and I might actually leave it on the skirt after the wedding.  I have to admit that this type of 'winging it' sewing of probably my favourite way to sew as it's easier to fit the garment to my shape.  So that's one more wedding crafting done and that now leaves the top and outer skirt to sew, and my shawl to knit.

Sunday, 13 February 2022

Wedding Outfit: the Skirt

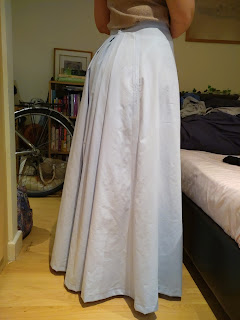
This is the first bit of my wedding outfit that I've made so far.  I did knit a shawl before, but realised that the colours didn't actually fit the rest of what the outfit will be.  I'll need to redone that.  I'm using the pattern 'The Fantail Skirt: historical' by the Dreamstress.  I wanted to make this pattern for a while and my wedding seemed like the perfect excuse.  A Fantail is also a New Zealand bird, which is where my partner is from so it seemed a nice connection.


I've decided to keep with the historical version of this pattern, though I have added some facing to the waistband to give it a little extra strength as there will be some additional weight on it.  I'm also using 100% cotton fabric, which happens to be second hand hotel bedding I brought online.  Some of this fabric is going to go towards making my top in white, but I wanted the skirt to be blue and so dyed it using Dylon fabric dye in Vintage Blue. 


One addition I have made to this pattern was to add a pocket to one of the seems, using a make your own pattern I made after watching a tutorial by Bernadette (though the Dreamstress also have a good tutorial on how to add a pockets).  I'll keep the draft for future use and I can see me adding pockets to quite a lot of things now I have it.  


I wasn't able to add the pocket to the usual place you would find pockets as there aren't any seams in that area side, so I placed it onto one of the back seams.  It'll work for holding what I need it to - hankie, engagement ring, possibly lipstick.


I wasn't sure, at the start, if I was going to make this a high - low skirt as I liked the look of it in on a wedding dress I liked the look of and my partner quite like the idea of it.  I decided I'd make it in its original form to begin with and then make a decision on the length of the front. In the end we both agreed that it looked better full length all around, especially with the folds in the back.


Not going to lie, I did have to redo the waistband a couple of times.  The first time I did all the measurements but somehow managed to make it 1 inch too small.  As I have no intention of starving myself to get into it, I redid it.  However, I then managed to make it 1.5 inch too big.  So I had to unpick it all again and start again.  At least it actually fits now.


I did have to wait until I had made the underskirt / petticoat before I could see how long I wanted the hem to be.  I originally hemmed it exactly as the pattern suggested, but it didn't have the length that I needed so I shortened the second turn over.  

As part of my wedding day will involve going on a walk I wanted to be able to have the front of the skirt lifted up a bit.  To get that I've attached ribbon into the hem and two front seams so that I can pull them up and tie them to lift the hem.  I did try hand finish the seams edges, but I noticed that the stitching was too obvious from the front side no matter how small they were.  So I chose to finish them using hemming tape.

For the fastenings, I decided to not put myself through doing buttonholes again and, instead, went for the hook and bar with snaps recommended in the pattern.


And it's done.  I have to say I'm quite proud of this and I really love how this turned out, despite how much work it was.  I especially like the back section with all the folds in it and the advantage to having a big bum is you don't have to make a bustle to get the authentic look.  Now all I need to make is the overskirt, the top, matching face masks, and re-knit the shawl.  All in about 2 months. That's doable isn't it.


Sunday, 16 January 2022

Making my Trousers: 1940's inspired

This is a very long overdue blog that I was actually meant to have written at the end of last year, but I'm finally getting round to it now.  I've wanted a pair of 1940's style women's trousers for a very long time, but could never find a pair that was in the style and fabric I wanted that also fitted my body shape and was in my price range.  That never happened so, in the end, I decided to just make them and found an updated vintage pattern, Simplicity 8447.


I decided that as this pattern also makes overalls I would make the top of the overalls as well, but have it so that it was detachable from the trousers giving me two garments in one.  I'm not going to lie, as this was my first time properly using a sewing pattern I was quite nervous about starting this and kept putting it off.  This wasn't helped by the fact that I knew I was going to have to make some changes to the pattern to get it to fit my body shape and that I'd already read through the pattern and confused myself a little bit. 


As I was intending on wearing these trousers quite a lot (they're basically the only everyday trousers I own) I wanted to get quite a hard-wearing, but relatively thin fabric so I went for a wool suiting fabric in a lovely navy colour.  The amount I planned, and actually do, wear this item meant that I also decided to bind the seems, even though you don't normally have to do much with wool fabrics as they don't tend to fray easily, using bias binding.  This did add quite a bit more work and a little bit more of a cost to my project, but I am glad I did it.  


Of course, I couldn't be all serious about the decisions I was making and the buttons I'm using for this project have smiley faces on them.


Once I had gotten used to the language in the pattern it actually went quite smoothly, though it did still take me a few days to get it completed.  This was mainly because it took me a while to accurately get the modifications to the waistline right.  I had had to start the pattern off with a much larger size so that it fitted around my hips, and then work on the side seams and darts to get it reduced enough to fits my waist comfortably.  Thankfully I didn't have to also add length to the waist of the trousers like I did with the shorts.  I've left the extra material in the darts in case I need to increase the waist size in the future, but for now, it fits perfectly and there's something really nice about having a pair of trousers I don't have to wear a belt with.


Once I had finally worked out how much of a reduction I had to make for the waist it was a lot easier to work on the top section as, again, I had to use a larger pattern to fit the chest and then bring it into the waist.  This time I did make the waistband a little bit larger so that it could fit comfortably over the trouser waistband when the two are joined together.  If I'm being completely honest I still haven't quite gotten round to adding the attachments which would then allow me to wear the two pieces together, but I'll get round to that soon.  With the weather being the way it is at the moment it would probably be a good idea to get that done very soon.


I really like these trousers and I've worn them a lot.  In fact, I've worn them practically every day that I've been off.  Apart from some spot cleans, I've also not had to wash them very often either.  Which is a joy seeing as laundry is a never-ending task I'm very happy to reduce.  The only thing I might possibly change about these is the turn-ups at the bottom of the legs.  They are a little bit thick and I'm not sure how I feel about the size.  I might reduce them a little bit or even get rid of them altogether, but that's still up for debate at the moment and I'll wear these a little longer before I make any final decision.  I've also cut another strip for the waistband but at a larger size, just in case I need to expand these.


Now that this project is complete I'm glad that I pushed through being nervous about starting and just got on with it.  I really like the outcome and it's given me a little bit more confidence to try out other patterns for items of clothing that I want in my wardrobe.   Which is just as well as I do have quite a lot of sewing planned for 2022.