

I've decided to keep with the historical version of this pattern, though I have added some facing to the waistband to give it a little extra strength as there will be some additional weight on it. I'm also using 100% cotton fabric, which happens to be second hand hotel bedding I brought online. Some of this fabric is going to go towards making my top in white, but I wanted the skirt to be blue and so dyed it using Dylon fabric dye in Vintage Blue.

One addition I have made to this pattern was to add a pocket to one of the seems, using a make your own pattern I made after watching a tutorial by Bernadette (though the Dreamstress also have a good tutorial on how to add a pockets). I'll keep the draft for future use and I can see me adding pockets to quite a lot of things now I have it.

I wasn't able to add the pocket to the usual place you would find pockets as there aren't any seams in that area side, so I placed it onto one of the back seams. It'll work for holding what I need it to - hankie, engagement ring, possibly lipstick.

I wasn't sure, at the start, if I was going to make this a high - low skirt as I liked the look of it in on a wedding dress I liked the look of and my partner quite like the idea of it. I decided I'd make it in its original form to begin with and then make a decision on the length of the front. In the end we both agreed that it looked better full length all around, especially with the folds in the back.

Not going to lie, I did have to redo the waistband a couple of times. The first time I did all the measurements but somehow managed to make it 1 inch too small. As I have no intention of starving myself to get into it, I redid it. However, I then managed to make it 1.5 inch too big. So I had to unpick it all again and start again. At least it actually fits now.

I did have to wait until I had made the underskirt / petticoat before I could see how long I wanted the hem to be. I originally hemmed it exactly as the pattern suggested, but it didn't have the length that I needed so I shortened the second turn over.


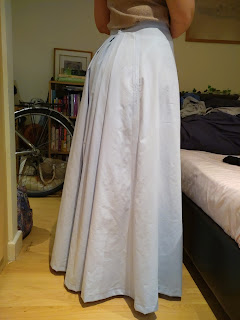
And it's done. I have to say I'm quite proud of this and I really love how this turned out, despite how much work it was. I especially like the back section with all the folds in it and the advantage to having a big bum is you don't have to make a bustle to get the authentic look. Now all I need to make is the overskirt, the top, matching face masks, and re-knit the shawl. All in about 2 months. That's doable isn't it.
No comments:
Post a Comment